It’s Planner Time!

I’ve always used some sort of planner to help organize my time. I have tried various ones over the years, including electronic versions like Cozi or the calendar app on my iPhone, hourly, horizontal, etc. but have yet to find peace with the method I was using. My bestie then introduced me to Plum Paper Planner. They have various options available to suit anyone’s needs and the regular planners come with several weekly layout options. At first, it was a little overwhelming with all the options but I eventually chose the hourly layout option since that was what I had been doing since becoming a Thirty-One consultant (I utilized time block scheduling each day). I like that the planner offered more writing room which I desperately needed because I tend to write largely. In addition, I like that there is extra room for notes and a “top 3” under each day. I also liked that the weekly pages have a vertical layout. Most planners you buy at conventional stores have horizontal layouts and don’t allow me enough room to fill in my day. One of the other positives with Plum is their ability to customize. I don’t mean adding a name here or monogram there, but full customization: name, monogram, or picture on the cover; font choices; color choices; pattern choices; and add-ons! Check out http://plumpaper.com/ to get the full scoop on everything you can do with it (I promise you won’t be sorry). I have since moved on to a different planner that I’m completely in love with – MAMBI’s The Happy Planner. I like that this one allows me to add and remove pages with ease and the boxes are even bigger than Plum’s so I rarely run out of room. (In later posts, I’ll show you my planners and the differences between them.)

So back to my Plum Planner – I started using it in November but hadn’t delved into doing anything but writing down my work and K’s school schedule. It wasn’t really working the way I wanted it to. Then my bestie told me about decorating it (say what?! Lisa Frank anyone?). I checked out her Instagram and joined a few groups on Facebook and oh my! It’s like a light shined straight down from heaven! My love of crafting was mixed with my need to have a more functional way to keep my life organized! And down the rabbit hole I fell. So many names, brands, stickers, washi (think smaller, thinner duct tape), and Etsy. Now, all of that can definitely get pricey if you let it; BUT, the crafter in me knew I could create my own for way, way less. Don’t get me wrong, I love the convenience of already made and cut stickers and some of them are just downright beautiful, but I just can’t justify spending money on something I can make myself. Plus, I can make it exactly how I want. Now I know some of you are thinking, what? Are you 8? Hear me out… It’s a lot like scrapbooking. You create weekly “layouts” using stickers and washi but you have your weekly plans instead of pictures (unless you choose to go that route – I don’t personally). It’s functional and makes me WANT to accomplish my tasks. It also gives me a creative outlet and an hour each week for just me. The very first one I created was for the blizzard earlier this year and features a beautiful blue and pink snowflake theme.

 Untitled

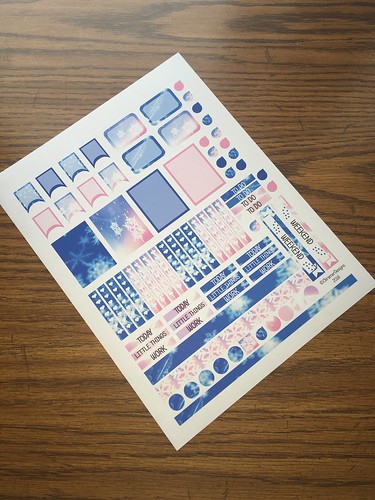
You can download the Plum Planner version here.

My goal is to release something new at least 2 times a month (I have 4 kids – 3 who are 4 and under so that may not always be doable). I have a few more that I’ll be posting over the next few days so enjoy and I can’t wait to see your layouts! Leave a comment below and tell me what you like about the theme and if there’s anything different I can do for future.

TERMS OF USE: Please remember that my designs take time to create and while I thoroughly enjoy sharing them free of charge, they are for personal use only. Please do not claim them as your own or distribute the file. Direct them back to here so they can enjoy them and others as well. Thank you!

In Craftiness,

Courtney K.

1 Comment

Filed under Crafting, DIY, planner freebies

FO’s & WIP’s

I haven’t had too much time to craft since the birth of my daughter at the end of August, but before she was born, I was able to complete a couple of projects for her.

The first one I finished was her Hugs & Kisses Layette, minus the booties (I didn’t have enough yarn to make them, unfortunately). I am so happy with the way this turned out! I used Baby Bee’s Sweet Baby Delight in Little Princess, which is a dark pink. I found beautiful, iridescent flower buttons at Jo-Ann’s to complete the cardigan. Now that the weather is getting cooler, I can’t wait to pull out this set for her to wear.

Finished

Hat 1 Hat 2

Next on my FO list is Willow’s Shell Headband. For this project, I used Baby Bee’s Sweet Delight Baby in Pink a Boo. It’s a very soft acrylic yarn which means it’s machine washable – a must for anything to do with kids! It turned out beautifully but it was definitely not a newborn size. I have to be honest and say that the pattern left a lot to be desired and was difficult to figure out sizing (and I say that with the utmost respect as a 18+ year crocheter). I guessed as best as I could as there is no gauge given. I would say the pattern, as written, would fit a 6+ month old. My finished headband didn’t turn out at all like the picture, even though I followed the pattern exactly. :/ It’s still beautiful though! I crocheted the flower using Teresa Richardson’s Slinky Crochet Flower pattern. I chose this one because it’s incredibly customizeable (is that even a word?). You don’t have to create 2 alike if you don’t want to. The pattern includes several different petal types that you can blend to make the perfect flower. I used the same yarn and color as the project above and looks fabulous against the pale pink!

Willow's Shell Headband

Now on to my WIP’s… I started Willow’s afghan/baby blanket at the end of July hoping to have at least the blocks finished before her arrival. I have to be honest and say that I’m not a big fan of knitting blankets. They seem to take FOREVER and I’m just too impatient. I decided to go with granny squares to make it an easily portable project. I wanted this afghan to represent our family full circle so I chose our wedding colors: pink, orange, and green. I’m using Joyce Lewis’ Simple 10-Petal Afghan Square as the base and doing 3 different color combinations.

Green SquarePink Square

Orange Square

I adore this pattern and think the colors really shine with it. The most difficult part of this pattern was figuring out how to to the last step. The designer included picture tutorials which are incredibly helpful! Once that was figured out, it goes pretty quickly. I can get one square completely finished in about 1 1/2 hours. Without the border, the afghan should be about 45″ x 45″. I haven’t decided yet on a border, how thick to make it, or which color(s) to use. I have a little ways to go yet as I only have about 12 of 36 blocks completed.

Since I had surgery and was laid up for about 5 days, I decided to pull out the Holly Days Throw that I started in 2011. It was a pattern I received through a Creative Knitting Magazine newsletter and I completely fell in love when I saw it. My only advice with this pattern is if you don’t like seed stitch, you probably wouldn’t like knitting this. The first and last 22 rows (of like hundreds of stitches) are seed stitch as well as the first and last 11 stitches per row. It creates a gorgeous border though!

Well, that’s about all I have for now so until next time, much love and many crafty blessings!

♥Courtney♥

Leave a comment

Filed under Crochet, FO's, Knitting, WIP

DIY Nursing Pads & WIP’s

As Willow’s birth gets closer and closer (only about 9 1/2 weeks left), I find myself fretting that I don’t have everything I need in terms of nursing and diapers. Before Harrison was born, I purchased some MegARoo’s cloth nursing pads (the disposable ones are AWFUL) at a steep discount since she was going out of business. I absolutely love them but found myself having to wash them so often because I didn’t have enough. I don’t want to deal with that this time around and after looking at the prices of purchasing more, I decided to make some.

Nursing Pads

It’s really helpful that I have all the supplies I need as well. The first thing I had to decide was what materials to use and what size I wanted when finished. I was really happy with MegARoo’s size so I knew I didn’t want to change that. The materials I decided on are PUL outer (waterproof), flannel inner, and cotton velour outer (gives the pad the stay-dry feel). I couldn’t find any information on how many layers of flannel to include inside so my first set had 4. The first one definitely didn’t turn out as great as I hoped. I initially cut the pattern to size since my plan was to use my machine’s overlock foot but the layers are too thick to get it into the foot properly. Needless to say, I scrapped it and started over. I added a 1/2″ seam allowance to the next one, straight stitched to hold the layers together, trimmed the seam allowance, and used a close (#1) and wide set zig-zag to overlock the edges to prevent any fraying. It came out okay but you can see some of the flannel through the sides and the edges have a somewhat lettuce effect (the pink pair in the picture above). It took me playing around with my setting to get the lettuce effect to go away and by the 4th of 5 pairs, I finally had a product I liked! The second pair I did was with the pirate PUL. I decided to change the inner layers from flannel to bath towel material since I was using the same thing in Willow’s NB AIO’s. I really thought this was a genius idea because I wouldn’t need as many layers but they would be incredibly absorbent. Um… what I didn’t compensate for is how THICK bath towel is. Even with only 2 layers inside, the pads are so bulky they would definitely be noticeable through a nursing bra. So I guess that’s my night time pair! My third set (the zebra print) I decided to use only 2 layers of flannel and think that will be perfect. At this point, I was still annoyed that my edges still had the lettuce resemblance so I tried moving my width a tad farther apart–to #1 1/2 instead of #1 and that did the trick on the last two sets (the green ones). I’m just so happy to have finally figured it out! Here’s the best of all of them:

Nursing Pads (Single)

Side note: I totally love this PUL pattern. It’s actually an older Thirty-One pattern! I’m still not really happy with how unclean the edges look though. I think I’ll try all flannel (no cotton velour) and see how that turns out and maybe turning and topstitching or turning and overlocking.

I’m still working on knitting items for Willow and am making progress on her layette set. I finished the front left panel and started the front right panel of the cardigan. I’m hoping to complete that today if I have time (thankfully it’s only 25 stitches per row). After that’s finished, I have to knit the 2 sleeves which I’m planning to do 2AAT to save time and ensure they are the exact same length. I’m thinking I should have done that for the left and right front panels too. Once that’s complete, then I’ll start the booties and hat which shouldn’t take more than a day or two and then can finally start her blanket! I’ve been dying to cast on since the yarn arrived a few weeks ago. It’s even prettier in person and incredibly soft.

Switching gears to general crafting–you may have noticed a new layout and tab on the homepage. I’m so happy that I finally got a layout and background I’m happy with! As far as the new tab, I created a bunch of free printables for a project I’m working on and blogged about over on The Kramer Menagerie. You can read more about it by clicking the link. I really love creating things and sharing them so enjoy!

Well that’s what I have for today so until next time, much love and many crafty blessings!

♥Courtney♥

1 Comment

Filed under Crafting, DIY, FO's, Knitting, Sewing, WIP